> ## Documentation Index
> Fetch the complete documentation index at: https://vectorpeak.cn/llms.txt
> Use this file to discover all available pages before exploring further.
# LangServe
> 介绍 LangServe 的服务化定位、FastAPI 集成方式和与 LangGraph Platform 的区别
## 1. LangServe
Written: 2026.06
## 2. LangServe介绍
### 2.1 组件功能
* 让你在本地调试好一个 Chain/Agent 之后,快速对外提供 API
* 避免手写 FastAPI/Flask 等接口代码
* 自动生成 OpenAPI 文档(Swagger UI)和 Playground(交互式测试)
### 2.2 核心优势
* 简单易用:通过少量代码即可完成模型服务的部署;
* 高性能:支持并发请求和高效推理,满足生产环境需求;
* 灵活扩展:可与其他工具(如 LangChain)无缝集成,构建复杂 AI 应用
## 3. 使用实践
### 3.1 安装 LangServe
langserve 支撑客户端和服务端分离部署使用,也可以将客户端和服务端放在一个环境运行
```python title="安装 LangServe" icon="python" theme={null}
pip install "langserve[all]"
```
或者使用 `pip install “langserve[client]”` 安装客户端代码
使用`pip install “langserve[server]”` 安装服务器端代码
### 3.2 创建 Chain
接下来使用 langchain 框架构建一个比较简单的 chain 用来演示 langserve 的使用方法。在 chain.py 中添加代码如下:
```python title="创建 Chain" icon="python" theme={null}
from langchain_core.output_parsers import StrOutputParser
from langchain_core.prompts import ChatPromptTemplate
from langchain_ollama import ChatOllama
# Prompt
prompt = ChatPromptTemplate.from_messages([
("system", "你是一个翻译助手。请将输入翻译成{language}。"),
("human", "{input}")
])
# LLM
llm = ChatOllama(base_url="http://localhost:11434", model="qwen3:14b", reasoning=False)
parser = StrOutputParser()
# 构建 chain 对象
translation_chain = prompt | llm | parser
```
### 3.3 构建 LangServe 服务端
langserve 中整合了一些列的工具和方法,使得将 chain 封装为服务端变得十分简单。main.py 文件内容如下:
```python title="构建 LangServe 服务端" icon="python" theme={null}
from fastapi import FastAPI
from langserve import add_routes
from chain import translation_chain
app = FastAPI(
title="翻译助手",
version="v1.0",
description="基于LangChain框架构建的翻译服务"
)
# 直接传 Chain 对象,不要 invoke
add_routes(app, translation_chain, path="/trans")
if __name__ == "__main__":
import uvicorn
uvicorn.run(app, host="0.0.0.0", port=8000)
```
## 4. 访问验证
### 4.1 启动服务
```console title="执行 main.py 文件即可启动服务,控制台打印如下内容" icon="terminal" theme={null}
INFO: Started server process [192489]
INFO: Waiting for application startup.
INFO: Application startup complete.
INFO: Uvicorn running on http://0.0.0.0:8000 (Press CTRL+C to quit)
__ ___ .__ __. _______ _______. _______ .______ ____ ____ _______
| | / \ | \ | | / _____| / || ____|| _ \ \ \ / / | ____|
| | / ^ \ | \| | | | __ | (----`| |__ | |_) | \ \/ / | |__
| | / /_\ \ | . ` | | | |_ | \ \ | __| | / \ / | __|
| `----./ _____ \ | |\ | | |__| | .----) | | |____ | |\ \----. \ / | |____
|_______/__/ \__\ |__| \__| \______| |_______/ |_______|| _| `._____| \__/ |_______|
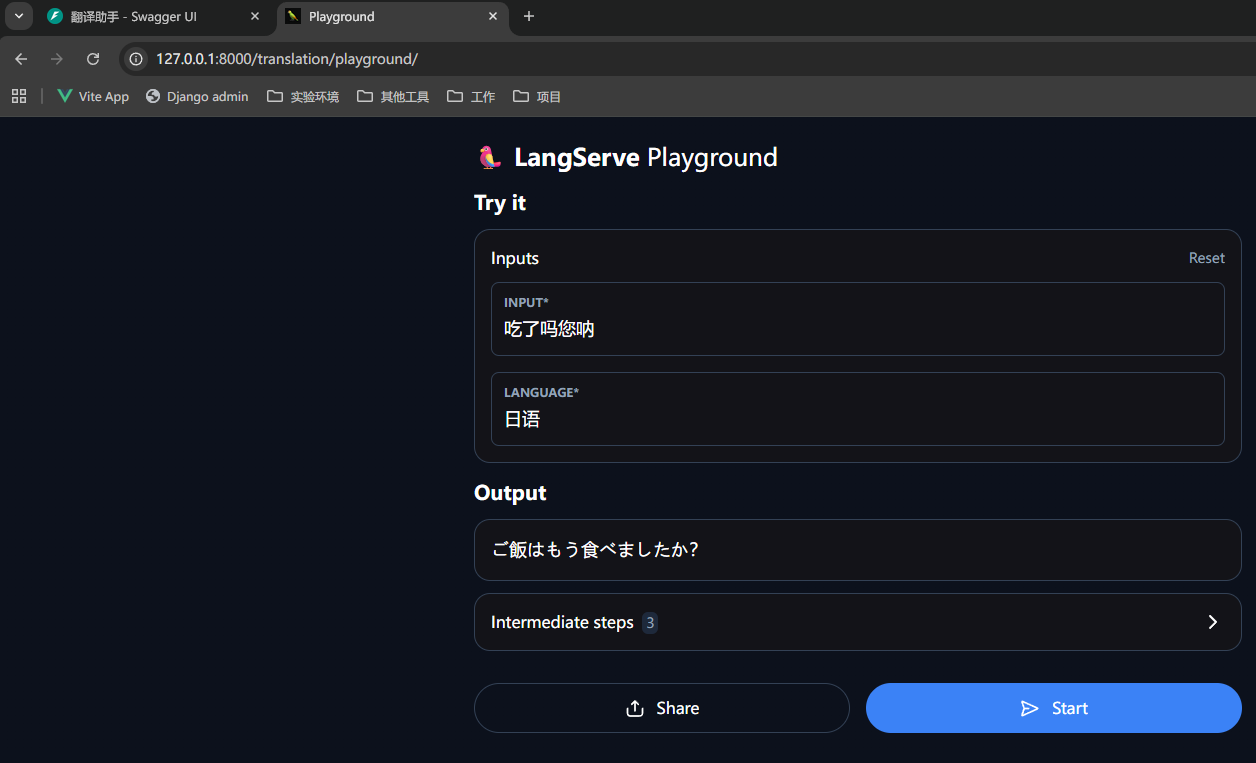
LANGSERVE: Playground for chain "/translation/" is live at:
LANGSERVE: │
LANGSERVE: └──> /translation/playground/
LANGSERVE:
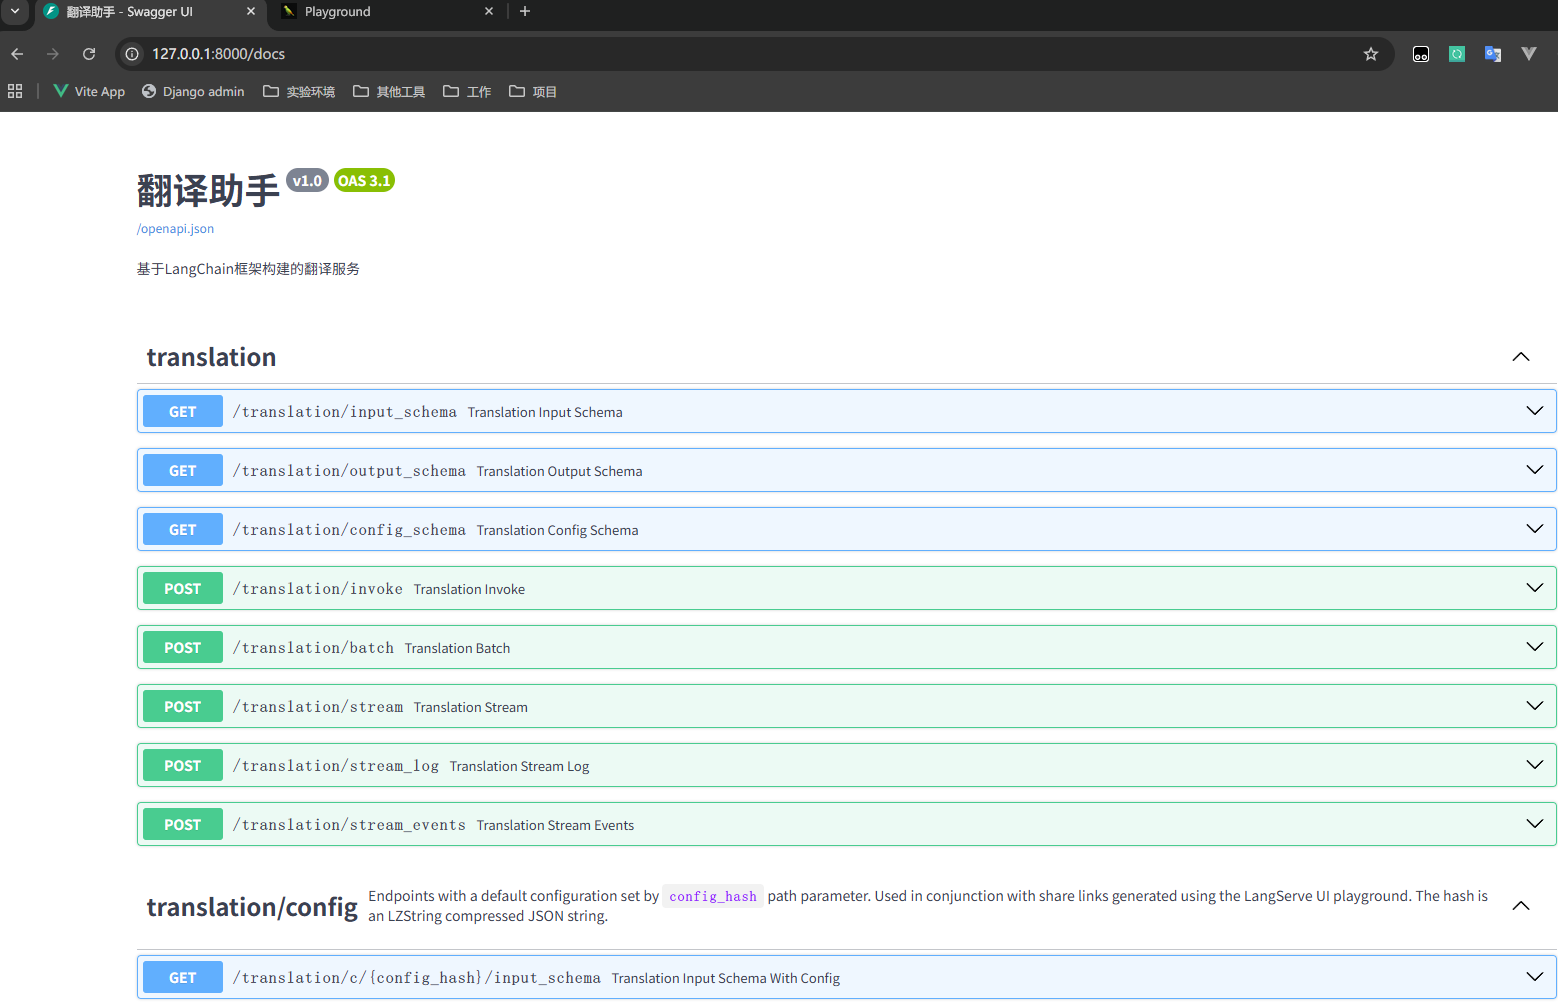
LANGSERVE: See all available routes at /docs/
```
### 4.2 访问接口文档
 ### 4.3 访问程序 web 页面
 ### 4.4 访问 API 接口
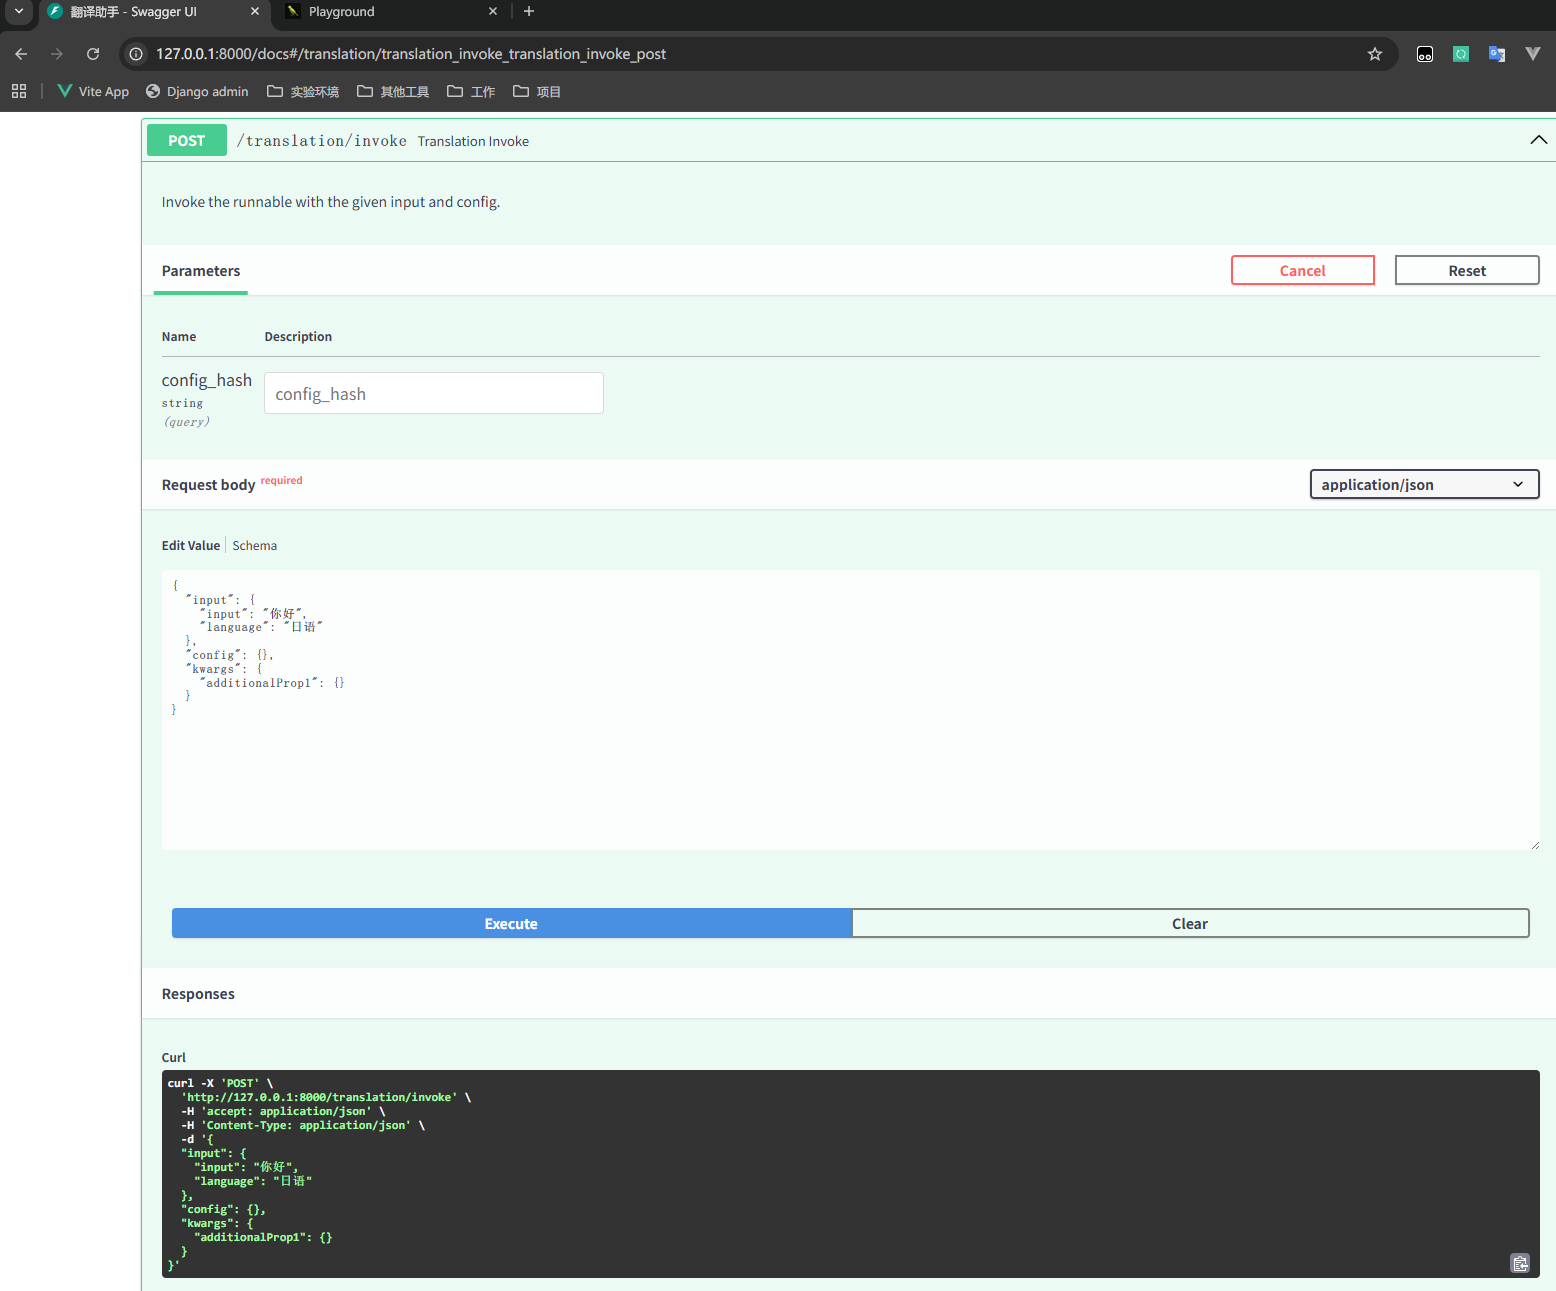 ```python title="访问 API 接口进行验证" icon="terminal" theme={null}
curl -X 'POST' \
'http://127.0.0.1:8000/translation/invoke' \
-H 'accept: application/json' \
-H 'Content-Type: application/json' \
-d '{
"input": {
"input": "你好",
"language": "日语"
},
"config": {},
"kwargs": {
"additionalProp1": {}
}
}'
{"output":"こんにちは","metadata":{"run_id":"fb6c033b-e597-4d11-82f8-a1721559cb60","feedback_tokens":[]}}
```
### 4.5 客户端访问
除了使用 web、api 工具外,也可以通过 langserve 的 client 端进行调用 client.py 文件内容如下:
```python title="客户端访问" icon="python" theme={null}
from langserve import RemoteRunnable
client = RemoteRunnable("http://127.0.0.1:8000/translation")
print(client.invoke({"input": "你好", "language": "法语"}))
```
```console title="执行结果如下" icon="terminal" theme={null}
Bonjour
```
```python title="访问 API 接口进行验证" icon="terminal" theme={null}
curl -X 'POST' \
'http://127.0.0.1:8000/translation/invoke' \
-H 'accept: application/json' \
-H 'Content-Type: application/json' \
-d '{
"input": {
"input": "你好",
"language": "日语"
},
"config": {},
"kwargs": {
"additionalProp1": {}
}
}'
{"output":"こんにちは","metadata":{"run_id":"fb6c033b-e597-4d11-82f8-a1721559cb60","feedback_tokens":[]}}
```
### 4.5 客户端访问
除了使用 web、api 工具外,也可以通过 langserve 的 client 端进行调用 client.py 文件内容如下:
```python title="客户端访问" icon="python" theme={null}
from langserve import RemoteRunnable
client = RemoteRunnable("http://127.0.0.1:8000/translation")
print(client.invoke({"input": "你好", "language": "法语"}))
```
```console title="执行结果如下" icon="terminal" theme={null}
Bonjour
```